Monday, July 18, 2016

Build Cross Platform Apps In Xamarin Forms - Part Two


Introduction
                            As we discussed previous article, we focused on how to create a login page, and how to navigate from one form to another.In this article we will focus on the menu Bar.we will add additional functionality to our sample Application.
 Step 1

 Create menu, right click in Menu folder and Select Add-->New Item.  Select Class under Visual C# , add a name and click OK.  This Class will help us to define Menu name and Page name for navigation.


Add the menu name and Page Fn(ContentPage information will be stored).
Category.cs  
  1. public class Category  
  2.     {  
  3.         public string Name  
  4.         {  
  5.             get;  
  6.             set;  
  7.         }  
  8.   
  9.         public Func<dynamic> PageFn  
  10.         {  
  11.             get;  
  12.             set;  
  13.         }  
  14.   
  15.         public Category(string name, Func<dynamic> pageFn)  
  16.         {  
  17.             Name = name;  
  18.             PageFn = pageFn;  
  19.         }  
  20.     }  

Step 2
             Create menu page, right click in Menu folder and Select Add-->New Item. Select Cross-Platform Under Forms ContentPage , add a name MenuPage and click OK. Now,create an objects for the category to add menu details ,pass it to ListView and create Itemseleted event so that when user touch MenuItem corresponding page will load.

Step 3
              We need Menu Icon so that user can click the menu icon and see the Menulist for that We have to add Menu icon, add both project IOS (under Resources) and Android (under Resources->Drawable) and add some sample pages for menu like Settings.cs, Sales.cs, EmpInfo.cs pages.

MenuPage.cs
  1. public class MenuPage : ContentPage  
  2.    {  
  3.        public MenuPage()  
  4.        {  
  5.            Title = "Menu";  
  6.            Icon = "menu.png";  
  7.   
  8.            Padding = new Thickness(10, 20);  
  9.            BackgroundColor = Color.White;  
  10.            var categories = new List<Category>  
  11.            {  
  12.                new Category("Home", () => new MainPage()),  
  13.                new Category("Employee Info", () => new EmpInfo()),  
  14.                new Category("Sales", () => new Sales()),  
  15.                new Category("Settings", () => new Settings()),  
  16.            };  
  17.   
  18.            var dataTemplate = new DataTemplate(typeof(TextCell));  
  19.            dataTemplate.SetBinding(TextCell.TextProperty, "Name");  
  20.   
  21.            var listView = new ListView  
  22.            {  
  23.                ItemsSource = categories,  
  24.                ItemTemplate = dataTemplate  
  25.            };  
  26.   
  27.            listView.ItemSelected += (sender, e) =>  
  28.            {  
  29.                if (OnMenuSelect != null)  
  30.                {  
  31.                    var category = (Category)e.SelectedItem;  
  32.                    var categoryPage = category.PageFn();  
  33.                    OnMenuSelect(categoryPage);  
  34.                }  
  35.            };  
  36.            Content = listView;  
  37.        }  
  38.        public Action<dynamic> OnMenuSelect { get; set; }  
  39.    }  
Step 4: We added the menu page and menu category. Now, we have masterpage and child page display.
  1. public class MasterDetails : MasterDetailPage  
  2.    {  
  3.        public MasterDetails()  
  4.        {  
  5.            var menuPage = new MenuPage  
  6.            {  
  7.                OnMenuSelect = categoryPage =>  
  8.                {  
  9.                    Detail = new NavigationPage(categoryPage);  
  10.                    IsPresented = false;  
  11.                }  
  12.            };  
  13.   
  14.            Master = menuPage;  
  15.   
  16.            Detail = new NavigationPage(new MainPage());  
  17.   
  18.            MasterBehavior = MasterBehavior.Split;  
  19.        }  
  20.    }  
Step 5: When you login, our masterpage should load with menu bar. Open LoginPage on the click event, given below:


  1. private void Add_Clicked(object sender, EventArgs e)  
  2.         {  
  3.             if (_userName.Text == "a" && _password.Text == "a")  
  4.             {  
  5.                 Application.Current.MainPage = new MasterDetails();  
  6.             }  
  7.             else if (string.IsNullOrEmpty(_userName.Text) || string.IsNullOrEmpty(_password.Text))  
  8.             {  
  9.                 DisplayAlert("Error", "Username and Password are required", "Re-try");  
  10.             }  
  11.             else  
  12.             {  
  13.                 DisplayAlert("Failed", "Invalid User", "Login Again");  
  14.             }  
  15.         }  
Thats it.Run the Application and login will see the menu bar with the icon and default toolbar.


Summary
                     We created a sample EmployeeInfo Application with the menu bar. In the coming articles, we will focus on the toolbar and enhance our menu bar.

Saturday, July 16, 2016

Build Cross Platform Apps in Xamarin Forms Part One


Build Cross Platform Apps in Xamarin Forms :
                            Xamarin.Forms is a cross platform allows us to easily create user interface layouts that can be shared across Android, iOS, and Windows Phone.We can share most of the code across Mobile platforms.If our resource is Limited and you are mostly going to focus on 
Functionality rather then Design.Then Xamarin.Forms is the best to Develop cross platform.
Let’s start.
                We will try to create a Sample Application in this Session and how to create Login Page and How to navigate from one form to another.
Next articles we will focus on menu and toolbar.
 Step 1:
File->New Project ->Templates ->Visual C# ->Cross platform ->Blank App(Xamarin.Froms.Portable).
Select Blank App and give the Project Name and Project Location.

 Once Application is created it will look like below.
EmployeeInfo is our shared  Project We can place our code and Design and this project is going to shared by Both android and IOS.
 
Step 2:
            Before do anything I just created some folders for my convenience and now We have to create a Login Page for this Right click in View folder and Select Add-->New Item
  Select Cross-Platform under Visual c# --> Forms ContentPage  add a name and click ok.Likewise Create MainPage.


Step 3:
 We can to add login form Code as below.
MainPage.cs
  1. public class MainPage : ContentPage  
  2.     {  
  3.         public MainPage()  
  4.         {  
  5.             Content = new StackLayout  
  6.             {  
  7.                 VerticalOptions = LayoutOptions.Center,  
  8.                 Children = {  
  9.                         new Label {  
  10.                             HorizontalTextAlignment = TextAlignment.Center,  
  11.                             Text = "Welcome to EmployeeInfo Xamarin Forms!"  
  12.                         }  
  13.                     }  
  14.             };  
  15.     }  
 LoginPage.cs

  1. public class LoginPage : ContentPage  
  2.    {  
  3.        private readonly Entry _userName;  
  4.        private readonly Entry _password;  
  5.   
  6.        public LoginPage()  
  7.        {  
  8.            var add = new Button  
  9.            {  
  10.                Text = "Login",  
  11.                TextColor = Color.White  
  12.            };  
  13.            _userName = new Entry { Placeholder = "UserName" };  
  14.            _password = new Entry { Placeholder = "Password", IsPassword = true };  
  15.            add.Clicked += Add_Clicked;  
  16.            var stackLayout = new StackLayout  
  17.            {  
  18.                Spacing = 20,  
  19.                Padding = 50,  
  20.                VerticalOptions = LayoutOptions.Center,  
  21.   
  22.                Children =  
  23.                {  
  24.                    _userName,  
  25.                   _password ,  
  26.                    add  
  27.                }  
  28.            };  
  29.            Content = stackLayout;  
  30.        }  
  31.   
  32.        private void Add_Clicked(object sender, EventArgs e)  
  33.        {  
  34.            if (_userName.Text == "a" && _password.Text == "a")  
  35.            {  
  36.                Application.Current.MainPage = new MainPage();  
  37.            }  
  38.            else if (string.IsNullOrEmpty(_userName.Text) || string.IsNullOrEmpty(_password.Text))  
  39.            {  
  40.                DisplayAlert("Error", "Username and Password are required", "Re-try");  
  41.            }  
  42.            else  
  43.            {  
  44.                DisplayAlert("Failed", "Invalid User", "Login Again");  
  45.            }  
  46.        }  
  47.    }  
App.cs 
  1. public class App : Application  
  2.    {  
  3.        public App()  
  4.        {  
  5.            MainPage = new LoginPage();  
  6.        }  
  7.   
  8.        protected override void OnStart()  
  9.        {  
  10.            // Handle when your app starts  
  11.        }  
  12.   
  13.        protected override void OnSleep()  
  14.        {  
  15.            // Handle when your app sleeps  
  16.        }  
  17.   
  18.        protected override void OnResume()  
  19.        {  
  20.            // Handle when your app resumes  
  21.        }  
  22.    }  
 Step 4:
           Run the application. 

 Enter username and password and click Login


Summary

               We created a Sample EmployeeInfo Application and add Login page and add some code to navigate around the Application in Next articles we will focus on Menu and Toorbar.
Thank you 

Create Connection String Outside VS


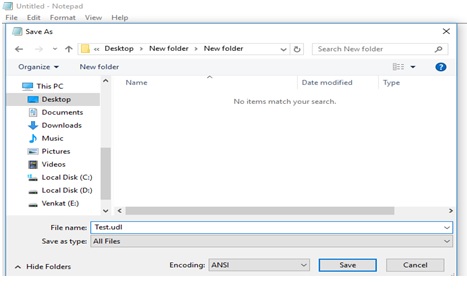
 Step 1: Open Notepad and click File-Save As-Test.Udl. Try to save the file format as UDL


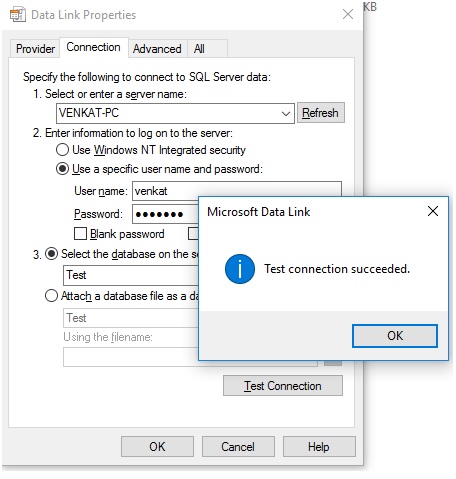
Step 2: Open the file and select SQL Server, followed by a username and a password.Once Authentication is done. We have to select the database, we want:


Step 3: Click the Test Connection and subsequently click OK:


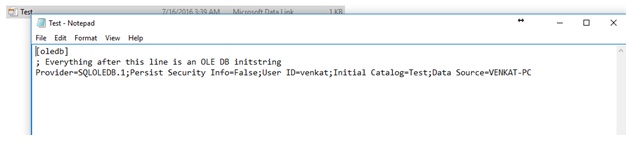
Step 4: Open the file as a text file (use right click and choose open with Notepad.


Tuesday, July 12, 2016

TempData , Peek and Keep ASP.NET MVC

 What is need of "TempData" ?

TempData helps to preserve data throughout the current request. The request can travel through action to action or controller to controller until the view is displayed.

What is difference between TempData and ViewData ?

"TempData" maintains data for the complete request while "ViewData" maintains data only from Controller to the view.

Does "TempData" preserve data in the next request also?

"TempData" is available through out for the current request and in the subsequent request it's available depending on whether "TempData" is read or not.

So if "TempData" is once read it will not be available in the subsequent request.

What is the use of Keep and Peek in "TempData"?

Once "TempData" is read in the current request it's not available in the subsequent request. If we want "TempData" to be read and also available in the subsequent request then after reading we need to call "Keep" method as shown in the code below.

@TempData["MyData"];
TempData.Keep("MyData");

The more shortcut way of achieving the same is by using "Peek". This function helps to read as well advices MVC to maintain "TempData" for the subsequent request.

string str = TempData.Peek("Td").ToString();

Difference between Html.EditorFor and Html.TextboxFor in ASP.NET MVC

If you are working on Web Application development using ASP.NET MVC, you would come across the Html.EditorFor and Html.TextboxFor in the Razor View.
The EditorFor is a kind of smart helper method. This will render the control based on the type in the model. For example, assume that you have a Boolean field in the model bind to the EditorFor. This will render checkbox.

Html.EditorFor

@Html.EditorFor(model => model.LastName)
This HTML helper method is very dynamic in nature. Based on which type of data is passed to this method, the output changes.

For example,
1. if model property type is of string type, it renders a textbox
2. if the property type is boolean type it renders a checkbox.
3. if the property type is of integer type, it render input type="number" textbox.

In order to control the output of the Html.EditorFor we can use EditorTemplates for different data types.

Html.TextBoxFor
@Html.TextBoxFor(model => model.LastName)
This HTML helper method only renders a TextBox as output irrespective of whatever data type the model property is of.